Feeding a physically based shading model
August 17, 2011 41 Comments
Version : 1.0 – Living blog – First version was 17 August 2011
With permission of my company : Dontnod entertainment http://www.dont-nod.com/
Adopting a physically based shading model is just a first step. Physically based rendering (PBR) require to use physical lighting setup and good spatially varying BRDF inputs (a.k.a textures) to get best results.
Feeding the shading model with physically plausible data is in the hand of artists.
There are many texture creation tutorials available on the web. But too often, artists forget to link their work with the lighting model for which textures are created. With traditional lighting model, there is often a RGB diffuse texture, RGB specular texture, specular mask texture, constant specular power and normal map. For advanced material you can add specular power texture, Fresnel intensity texture, Fresnel scale texture, reflection mask texture…
Physically based shading model is more simple and will provide a consistent look under different lighting condition. However, artists must be trained because right values are not always trivial to find and they should accept to not fully control specular response.
Our physically based shading model requires four inputs:
- Diffuse color RGB (named diffuse albedo or diffuse reflectance or directionnal-hemispherical reflectance)
- Specular color RGB (named specular albedo or specular reflectance)
- Normal and gloss monochrome
Authoring time of these textures are not equal. I will expose the advice and material reference to provide to artists to help them authoring these textures. The better the artists workflow will be, the better the shading model will appear. Normal and gloss are tightly coupled so they will be treated together.
When talking about texture, we talk about sRGB/RGB color space, linear/gamma space… All these concepts are well described in [8] and will not be explained here.
Before digging into the subject in more detail, here are some advices for the textures workflow :
- Artists must calibrate their screens. Or better, all your team’s screen should be calibrated in the same way [6].
- Make sure Colour Management is set to use sRGB in Photoshop [5].
- Artists will trust their eyes, but eyes can be foolish. Adjusting grey level texture can be annoying [7]. Provide reference material and work with a neutral grey background.
- When working with sRGB color space, as it is the case for most textures authored with Photoshop, remember that the middle grey is not 128,128,128 but 187,187,187. See John Hable post [22] for comparison between 128 and 187 middle grey.
- Game engine should implement debug view mode to display texture density, mipmap resolution, lighting only, diffuse only, specular only, gloss only, normal only… This is a valuable tool to track textures authoring problems.
- Textures should be uniform in the scene. Even if all textures are amazing, only one poor texture on the screen will attract the eye, like a dead pixel on a screen. The resulting visual feeling will be bad. The same scene with uniform density and medium quality will look better.
Dielectric and metallic material
There are different types of substances in real world. They can be classified in three main group: Insulators, semi-conductors and conductors.
In game we are only interesting by two of them: Insulators (Dielectric materials) and conductors (Metallic materials).
Artists should understand to which category a material belong to. This will have influence on diffuse and specular value to assign to this material.
I already talked about these two categories in the post Adopting a Physically based shading model.
Dielectric materials are the most common materials. Their optical properties rarely vary much over the visible spectrum: water, glass, skin, wood, hair, leather, plastic, stone, concrete, ruby, diamond…
Metals. Their optical properties vary over the visible spectrum: iron, aluminium, copper, gold, cobalt, nickel, silver…
See [8].
Diffuse color
Diffuse textures require some time to author.
In the past, it was usual to bake everything in a “diffuse” texture to fake lighting effects like shadow, reflection, specular… With newer engine, all these effects are simulated and must not be baked.
The best definition for diffuse color in our engine is : How bright a surface is when lit by a 100% bright white light [4]. This definition is related to the definition of light unit from the punctual light equation (See Adopting a physically based shading model).
The lighting unit for these light sources is specified as the color a white lambertian surface would have when illuminated by the light from a direction parallel to the surface normal.
This mean that when you setup a light in the game editor with 1 in brightness and point it directly on a quad mapped with a diffuse texture, you get the color as displayed in Photoshop (be aware of postprocess).
Diffuse texture must increase visual quality of the scene. A scene should look good in a lighting only view mode and applying diffuse texture must add details. Too many time is wasted creating “looking good” diffuse texture which don’t add anything to the scene or worse, remove lighting information.
To be compliant with our physically based shading model a diffuse texture should be rather bright. Artists tend to author diffuse color too dark. Too dark average values of diffuse colors increase the difference in the ratio between specular and diffuse intensities and make specular feeling too bright. Moreover, with a global illumination solver (like the one we use to generate lightmaps), the bounce of light can be too low and forces the lighter to adjust the brightness of the lights. But after these adjustments, the direct lighting will be too strong [4].
Uniformity of diffuse textures is really important. If diffuse texture are well authored and other not, the lighters will be unable to do right lighting setup.
The advantage of using a physically based shading model is that we can choose diffuse color value based on real world value. We used two kind of references for our game :
1. Taking picture of real world with the method explained by Henry Labounta in its GDC 2011 talk “Art Direction Tools for Photo Real Games” [24]
- Wait an overcast day to reduce directional lighting information.
- Shot a raw photography (mean don’t use gamma space mode but linear mode) containing an X-rite passport Macbeth chart [30].
- Import and calibrate photo using exposure and blacks with the help of the reference Macbeth chart value .
- The resulting sRGB picture will be used as reference for artists.
A X-rite passport Macbeth chart looks like this

2. Taking physical albedo value [28]
Disclaimer : All the numerical values provided are in linear space. And lighting processing inside the shader must be in linear space.
Charcoal       0.04
Fresh asphalt  0.04
Worn asphalt   0.12
Bare soil      0.17
Green grass    0.25
Desert sand    0.40
New concrete   0.55
Ocean Ice      0.5–0.7
Fresh snow     0.80–0.90
One of the darkest substances on earth is charcoal, the brightest is fresh snow.
Diffuse color of the above substances should be a little less than provided value which includes some specular.
This allows to define a range for diffuse color in sRGB of 50-240.
In both cases the histogram of the image should be rather high. Resulting in a bright average diffuse color.
Details can be added to the diffuse texture by baking some micro-occlusion which can’t be handled by the engine. An ambient occlusion is interpolated with the texture at a low weight. The ambient occlusion color should not be black but should match the hue of the diffuse texture [29].
For pure metallic material, the diffuse color should be black (Total reflection). In this case, the color of the object is based on specular value.
In case of rusted metal, a mix of specular and diffuse provide good result.
We store diffuse color as sRGB DXT1 (or DXT5 if translucent) middle resolution.
Added note:
When taking real world photo as reference, some process can be used to remove directional lighting information like in [25]. Crazybump [26] has some tools to do that. Epic provides a good camera setup here [27].
Using full energy conservation between diffuse and specular will automatically set diffuse to a low value allowing metallic materials to respect the constraint of having low diffuse color.
Care must be taken when testing diffuse texture into the engine. Are postprocesses enabled (bloom, tone mapping…) ? The influence of postprocess on the result is huge, particularly the tone mapper. Actually we let the tone mapper enabled when testing but this may not be the best way.
Another way of getting good diffuse texture references is to use polarization filter on camera and light similar to [3] or [31]. The setup is a little more complex but give good result.
Specular color
Specular texture is rather simple and not time-consuming.
With classic game lighting model specular texture is high-resolution RGB and specular power is a constant value for the whole material. For advanced material, a specular power texture is authored. With physically based shading model, artists must switch their mind. Specular texture is now rather constant and gloss is high-resolution monochrome. For advanced materials, a high-resolution specular texture can be authored [1].
A great advantage of PBR is that we can (and should) use real world material index of refraction to specify the specular albedo. Index of refraction will allow to define the characteristic specular reflectance of the material which is the value of Fresnel reflectance at 0° (reflectance at normal incidence) : 
Disclaimer : All the numerical values provided are in linear space. And lighting processing inside the shader must be in linear space.
To turn an index of refraction to
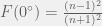
For a practical sample, take the index of refraction of water (1.33) and put it inside the equation:
0.02 is the specular color.

Dielectric transparent material (water, glass, plastic, gemstones…) indices of refraction are largely available on the web [2][21]. But lot of usual materials like concrete, fabric, rock, wood… are not. And it is far more difficult to measure index of refraction of such materials.
Good rules for specular color range of dielectric materials are:
- No value under 0.02
- Common gemstones 0.05-0.17
- Common liquids 0.02-0.04
- When not finding reference for a dielectric material, setting a value of 0.04 (around plastic)
Except gemstones, any dielectric material we will use should be in the range 0.02-0.05 [1].
Here are some sample values:
Quartz    0.045593921
ice       0.017908907
Water     0.020373188
Alcohol   0.01995505
Glass     0.04
Milk      0.022181983
Ruby      0.077271957
Crystal   0.111111111
Diamond   0.171968833
Skin      0.028
Note how these values are not intuitive for an artist. As a side note for character artists, see that specular reflectance of skin is white (0.028) [10] (There is a study of index of refraction of human skin here [32]).
Metallic materials are handled a little differently. Index of refraction of a metal material is a complex number 
Where 

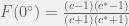
Refractive indices of metallic material tend to vary significantly over the visible spectrum. So just taking a value for n and k at a given wavelength is not sufficient. The spectral distribution of
The Fresnel equation needs to be evaluated for each available spectral sample of complex refractive index over the visible portion of the spectrum. This will result in a spectral reflectance with multiple samples. Each spectral reflectance sample then needs to be multiplied with the CIE X, Y and Z color-matching functions as well as the spectral power distribution of the appropriate illuminant (most likely D65). The resulting curves must be integrated and normalized (with normalization constants set such that the illuminant would have a Y value of 100).
Finally, a matrix transform should be used to convert the XYZ values into RGB values with the appropriate primaries (most likely the sRGB/Rec.709 primaries). Gamut mapping of some kind may be needed if any of the RGB values are out of gamut [9].
Fortunately, I wrote a little program at home to do this.
You can get this program with source code here SL-GetSpecularColor (WordPress doesn’t handle zip file, so right click then save target. Then rename extension to “.zip”. Code doesn’t handle error and program require VS2008 runtime).
Usage is really simple: “SL-GetSpecularColor.exe XXX.txt” and you will get a linear color between 0 and 1.
XXX.txt is a file with spectral distribution of complex refractive indices.
Only files downloaded from http://www.filmetrics.com/refractive-index-database are working for now. If you improve the program with other sources, tell me.
Using the program above gives you the linear RGB specular color. Here are some values I gathered:
               R            G            B
Silver      0.971519    0.959915    0.915324
Aluminium   0.913183    0.921494    0.924524
Gold        1           0.765557    0.336057
Copper      0.955008    0.637427    0.538163
Chromium    0.549585    0.556114    0.554256
Nickel      0.659777    0.608679    0.525649
Titanium    0.541931    0.496791    0.449419
Cobalt      0.662124    0.654864    0.633732
Platinum    0.672411    0.637331    0.585456
As you can expect, you won’t spend your time finding all the refractive indices of metallic material. Especially since values are for pure laboratory material. But these specular colors can be used as references. Moreover, we can see that specular colors for metallic objects are close to what we think the color of the metal is. The basic rule for metal is to setup a value above 0.5.
We store specular color as sRGB DXT1 low resolution and reference are only provided in sRGB color space which:
- Avoids artists to deal with sRGB/RGB mismatch.
- Allows more precision with low specular color.
- Allows artist to work with not completely dark colors (for dielectric material).
We provide a reference specular chart to the artists which looks like the image below (intentionally blurred and reduced):

Edit: The specular chart is now available at this link Dontnod specular and glosiness chart.
Added note:
With normalized lighting model without Fresnel effect like 
You may notice that we don’t use any specular mask texture. Specular texture is no more a scale of specular response. In real world, everything is shiny [3] and this is roughness (low gloss) and low specular color which will allow to mimic “matte” material. However the specular response in fine cavities can be too strong with our lighting model because of Fresnel effect. [1] suggests two way to solve this:
- Use an ambient occlusion texture to apply on specular term.
- Modify the Schlick approximation in a similar way as Schüler in [20]:
.
For the Schüler case, the assumption is that no real value of specular can be below 0.02. When a value below 0.02 is set in the specular texture, the maximum reached by Fresnel term is below 1.
The drawback of this method is to require a high-resolution specular texture.
In both cases the texture budget increases and we chose to go with these artifacts.
Normal and gloss
The most important textures are normal map and gloss map.
Normal map and gloss map require most of the artists’ effort. They should add crazy details into them.
Ideally, the game should look pretty good with a view mode displaying lighting only.
Normal map:
There is several good reference on how to create good normal map available on the web and this is not related to PBR so I won’t talk about them here.
Added note:
Several rules should be followed to get most of the normal map. We are not following all of them but should do:
- Encoding/Decoding normal. Like for compress/decompress data, the exact reverse of algorithm use to encode the normal should be used for decode it. I know of two engines doing this the right way:
– Crytek with the help of polybump [12].
– Naughty Dog with Uncharted 2. Naughty Dog wrote a plugin for XNormal[14] which allows to generate normal map with their encoding method [15]. Naughty Dog’s plugin is based on the awesome thesis of Morten Mikkelsen [13]. - Generate most of the normal map from high and low resolution objects (Really time-consuming) [16].
- Use a 16bit floating point normal map pipeline [17].
- Always normalize normal map after modification.
- Generate normal map in the texture coordinate convention of the engine.
Gloss map:
From my point of view, the most difficult texture to author is the gloss map.
Reasons are:
- No tutorial on the web about this texture (at least created for a physically based shading model).
- Specular power range deduced from gloss values is completely dependent of your engine.
- Values are numerical, neither color nor vector.
The gloss map is closely tied to the normal map. Ideally, gloss map should be generated in the same way as the normal map. It mean it should be authored under sculpting tools like MudBox or ZBrush. Indeed, bumping in the normal map should be translated by higher roughness in the gloss map (low gloss means high roughness).
However, new knowledge takes time to master and we still author gloss map by hand in Photoshop. The gloss map encoding (non-linear) and specular power range (2-2048) we chose allow a perceptual linear distribution. Details like scratches, pores, grooves… can be added even without being in normal map.
Artists need to test the response of the lighting inside the engine more frequently than for other textures. To help them we provide a chart which maps some linear monochrome glossiness values (0-255 under Photoshop) to a screenshot of a cubemap blur level.

This chart is highly engine specific.
We store normal map and gloss map in DXT5 high-resolution which:
- Allows to force artists to use same resolution for normal map and gloss map.
- Allows better mipmaping (see added note) because we can retrieve which gloss map is linked to which normal map.
- Allows not to apply a second non linear encoding on the non linear gloss value. We store gloss in linear in the alpha channel.
Added note:
Mipmapping of normal map and gloss map are active research topics. The fact that a gloss map, encoded in a non linear way, results in a wrong filtered value is not the main problem. When generating mipmap for both map, the variation in normal should be used to modify the value of the gloss map. This allow to conserve the specular shape with the distance, reduce specular aliasing and reduce texture thrashing. For more details see these interesting posts by Stephen Hill [11] and Marc Olano [18]. Dan Baker gave a great talk on this topic at GDC 2011 [20] . Dimitar Lazarov at siggraph 2011 provide must-read slides [31] and describe step for generating gloss mip for their lighting model.
Details normal map and details gloss map are other topics which require attention. Compositing of these textures is not trivial.
Reference
[1] Hoffman, “Crafting Physically Motivated Shading Models for Game Development” and “Background: Physically-Based Shading” http://renderwonk.com/publications/s2010-shading-course/
[2] http://www.robinwood.com/Catalog/Technical/Gen3DTuts/Gen3DPages/RefractionIndexList.html
[3] Hable, http://filmicgames.com/archives/547
[4] Epic game, “UDK documentation” http://udn.epicgames.com/Three/TexturingGuidelines.html
[5] “Photoshop CS3 Color Settings” http://www.computer-darkroom.com/ps10_colour/ps10_1.htm
[6] “LCD monitor test images” http://www.lagom.nl/lcd-test/
[7] Adelson, “Checker-shadow illusion” http://www.michaelbach.de/ot/lum_adelsonCheckShadow/
[8] Akenine-Möller, Haines, Hoffman, “Real-Time Rendering 3rd Edition” http://www.realtimerendering.com
[9] Personal communication with Naty Hoffman
[10] d’Eon, Luebke, “Advanced Techniques for Realistic Real-Time Skin Rendering” http://http.developer.nvidia.com/GPUGems3/gpugems3_ch14.html
[11] Hill, “Specular Showdown in the Wild West” http://blog.selfshadow.com/2011/07/22/specular-showdown/
[12] Crytek, http://crytek.com/cryengine/cryengine2/overview
[13] S. Mikkelsen, “Simulation of Wrinkled Surfaces Revisited” http://image.diku.dk/projects/media/morten.mikkelsen.08.pdf
[14] XNormal, http://www.xnormal.net/1.aspx
[15] Diamant, Simantov, “Character Pipeline: An In-depth Look at the Creation of U2’s Characters” http://www.slideshare.net/naughty_dog/uncharted-2-character-pipeline
[16] Pangilinan, Ruppel, “Uncharted 2 art direction” http://www.slideshare.net/naughty_dog/gdc-final-sliced
[17] Kaplanyan, “CryENGINE 3: Reaching the Speed of Light” http://advances.realtimerendering.com/s2010/Kaplanyan-CryEngine3(SIGGRAPH%202010%20Advanced%20RealTime%20Rendering%20Course).pdf
[18] Olano, “Shiny and CLEAN” http://gaim.umbc.edu/2011/07/24/shiny-and-clean/
[19] Olano, “On Error” http://gaim.umbc.edu/2011/07/26/on-error/
[20] Baker, “Spectacular Specular -LEAN and CLEAN specular highlights” http://www.google.fr/url?sa=t&source=web&cd=2&ved=0CCIQFjAB&url=http%3A%2F%2Fwww.gdcvault.com%2Fplay%2F1014558%2FSpectacular-Specular-LEAN-and-CLEAN&ei=XpVETpDoJoPm-gbrqdyTBw&usg=AFQjCNGC26_xSlrstEqFYHIbLuEAhqU8vg
[21] http://www.luxpop.com/
[22] Hable, “Linear-Space Lighting (i.e. Gamma)” http://filmicgames.com/archives/299
[23] Schüler, “An efficient and Physically Plausible Real Time Shading Model” Shader X7 book
[24] Labounta, “Art Direction Tools for Photo Real Games” Unavailable on gdcvault, sum up here http://stachmo.wordpress.com/2011/03/12/the-epic-gdc11-adventure-day-5/
[25] “The Diffuse Texture and Seamless Textures” http://robertokoci.com/diffuse-texture/
[26] Crazybump http://www.crazybump.com/
[27] Epic game, “UDK documentation” http://udn.epicgames.com/Three/TakingBetterPhotosForTextures.html
[28] Wikipedia http://en.wikipedia.org/wiki/Albedo
[29] Ferguson, “Iterating Realistic Human Rendering: Boxers in FIGHT NIGHT” GDC 2011
[30] http://www.xrite.com/home.aspx
[31] Lazarov, “Physically Based Lighting in Call of Duty: Black Ops” http://advances.realtimerendering.com/s2011/Lazarov-Physically-Based-Lighting-in-Black-Ops%20(Siggraph%202011%20Advances%20in%20Real-Time%20Rendering%20Course).pptx”
[32] Tsenova, Stoykova, “Refractive index measurement in human tissue samples” http://www.iomt.bas.bg/page_10/es/publications/References_C/Ref_C24.pdf

Pingback: The Blinn-Phong Normalization Zoo | The Tenth Planet
Pingback: Confluence: Programming
Pingback: Readings on physically based rendering | Light is beautiful
Pingback: Confluence: Development
Pingback: Confluence: Art
Pingback: Confluence: Frostbite Development
Seb, just wanted to say a giant THANK YOU for these articles! You’ve changed my life! Yours are the clearest and most straightforward articles on PBR to this day. The simple concept of dielectrics and metals represented by the same spec map was eyeopening. I’ve been using essentially your lighting model at our company for over a year now, and it has completely revolutionized our art creation. We can create art faster, more correctly and effectively, and the results are much more visually interesting, run faster (less draw calls), fits great with deferred rendering, just all around goodness!
I know everybody’s doing this nowadays, but I think you deserve credit for putting out such clear articles before most everyone else.
Thanks!
Your are welcome.
The credit come mainly to Naty Hoffman as this is his lighting model which come from his Siggraph 2010 talk.
Yoshiharu Gotanda (TriAce) and Christian Schüler also put a lot of effort in this topics well before me. By the way I recommend the very understandable FMX 2013 slides of Christian on his blog on the PBR subject for artist: http://www.thetenthplanet.de/archives/3684
Cheers
Pingback: Confluence: Substance Designer
Pingback: Confluence: Substance Designer
Pingback: Confluence: WoT Development
Pingback: Confluence: Art
Pingback: Confluence: Substance Painter
Pingback: Confluence: Substance Painter
Pingback: Readings on Physically Based Rendering | Interplay of Light
Pingback: Fuel dispenser - Game Artist Forums
Thanks for your blog. I’ve found a lot of useful materials here, and your blog helped me to understand these topics deeper.
I have 2 questions to you:
1. What do you think about using grayscale texture as albedo?
In mobile game we cheat as much as possible to achieve great results, so we plan to use:
RGBA compressed texture
R: albedo.grayscale
G: normal.x
B: normal.y
A: glossiness map
F_0 can be set per object (one value), or per vertex (vertex color).
In case if artists need full albedo map we use 2 textures. 1 for albedo, 1 normal.
2. Also on low end devices for metal materials I plan to cheat. Instead of computation of FresnelShlick for all 3 values I plan to use average and compute only for float instead of vec3.
Looks like reasonable degrade for low-end.
What do you think about that?
Hey,
Warning, I assume you have black diffuse albedo for metal and F0 define the color of the metal.
1. Grayscale for albedo is a bit strange. Are you doing a monochrome game ?
It make sense to store luminance only then chrominance at lower resolution but using only grey level will just give you a black and white game.
2. Will work for several mocnochrome metal (silver, aluminium, iron …). Will fail with colored metal like gold (again monochrome game ?). I would simply apply no fresnel on metal on mobile like purpose some offline renderer (VRay).
But I think my answers don’t fit your questions because I think you don’t use a BRDF like I describe it: diffuseAlbedo / PI + Fresnel(F0, LdotV) * normalization_factor * (N.H)^specPower
I have never done mobile dev by the way, if you want more information on PBR on mobile, take a look at the future GDC session on mobile dev: http://schedule.gdconf.com/session-id/826422
hope that’s help
Cheers
Thank you for this I have compiled a Mac version and put it here: https://www.dropbox.com/s/ypydi5vz4dhlqzc/getspecularcolour
I hope that is okay, cheers.
Yes, no pb 🙂 . Thx
I’m curious about how specifically you get albedo values. Is it enough to have an unshadowed photograph that has been calibrated with the X-Rite passport utility?
I assume that is not the case. What should I be doing in order to get correct albedo values for marble or tungsten for instance? Google is of little use in this case.
In your article the jump from using a Macbeth color checker and correct albedo seems almost instantaneous.
I found this paper which makes it a little clearer:
Click to access 1110.0035v1.pdf
However, a thorough guide would be absolutely fantastic. Hell, maybe someone who isn’t as incompetent as me could write a program that would convert photos directly to albedo maps with the aid of a ColorChecker.
I meant feldspar not tungsten.
Can’t edit comments for some reason.
Hey,
I give more details about the albedo stuff here: http://www.fxguide.com/featured/game-environments-parta-remember-me-rendering/
And yes, the method use a photograph with a macBeth chart under overcast sky only (take care that there is always some specular into the mix, even with a polorizer filter). The paper you reference do the same thing, except they use the know albedo they measure of a white A4 paper instead of using a macBeth chart (Which have a lot more know albedo values). Still capture the real albedo is a difficult process, but for game we tolerate the error.
You will also be interested by this paper: http://blog.selfshadow.com/publications/s2012-shading-course/mcauley/s2012_pbs_farcry3_notes_v2.pdf
they describe a plugin for photoshop to do the automatic conversion. Still implementation is not simple and I would love they have share their tools 🙂 This is a bit different from the technique I describe in the FX guide article (which is not mine but the one of Henry Labounta), which require a manual calibration which respect the tone of the different matter and require artistic skills (I am not the one doing this, this was the art director).
Another interesting tools is lightbrush: http://www.twitterbuttons.biz/stats/lightbrush.com. Which actually use a technique reverse to this one. i.e use shadowed picture instead of unshadowed. But I have never done in-depth comparison of the result.
Keep in mind that whatever the technic you chose, the most difficult part is to take accurate picture, then you need to find the time to process all these textures.
Thank you very much for these links and your time. I think the last link is wrong however.
http://www.tandent.com/support/
This article was really helpful.Thank you for taking the time in writing this article.I really appreciate it.
However i am not able to understand how do you find in photoshop what is the “SRGB” value of a colour.You had written colour of green grass is 0.25.How do i find which colour is 0.25 in photoshop.
Hi,
0.25 is the normalized linear RGB value, it mean
0.25 * 255 = 64 in RGB
an approximation to convert to sRGB is to do
0.25^(1/2.2) * 255 = 136 in sRGB
But exact calulation is more complex, here is an excel formula that you can copy past:
“=255*IF(D10<=0,0031308;D10*12,92;(POWER(ABS(D10);1/2,4)*1,055)-0,055)"
replace the D10 by the cell you want to convert
with the exact formula the result is 137 in sRGB.
Don't know how to convert linearRGB to sRGB in photoshop, if anyone know ?
hi, you can also try this tool to calibrate your albedo textures
Pingback: Simple PBR Shader for Blender 2.72 Cycles |
Pingback: PBR en Element 3D v2 (parte 3) | Dan Garotte Portfolio
Pingback: [notes] Material Reflectivity / spec value | Hap|仲林: The Artisteer
Pingback: Things in Unity That Are a Bit Rubbish (and How to Fix Them) | Sc0tt Games .com
Hey,
It’s awesome article with proper refrance.. it’s realy helpfull to learn more about shading and rendering.
Thanks a lot for the article
Pingback: Screen Space Glossy Reflections | Roar11.com
Hi, in the beginning of the post, it says: “When talking about texture, we talk about sRGB/RGB color space, linear/gamma space… All these concepts are well described in [2] and will not be explained here.”
I looked it up in your list of references, and it obviously isn’t [2]. I guess you wanted to write [22]?
Thanks 🙂
Hi.
ah indeed, it is not [2], but more [8], the real time rendering book. There is plenty of resource on the internet talking about it, Like this one: https://developer.nvidia.com/gpugems/GPUGems3/gpugems3_ch24.html. THanks for the notice
Thanks for this amazing article. However, I cannot get your SL-GetSpecularColor.exe to work. Can you please provide a bit more info on how to properly run this exe?
Thanks!
Chad
Pingback: Realtime Rendering Technology 資料 – Tech masuk
Pingback: Initial Research – Part 2, PBR Workflows | AMY POTTER FINAL PROJECT
Pingback: What is PBR? | 甘蔗清查伴筆記
Pingback: What is PBR? | 趙辰懷 Guenter